

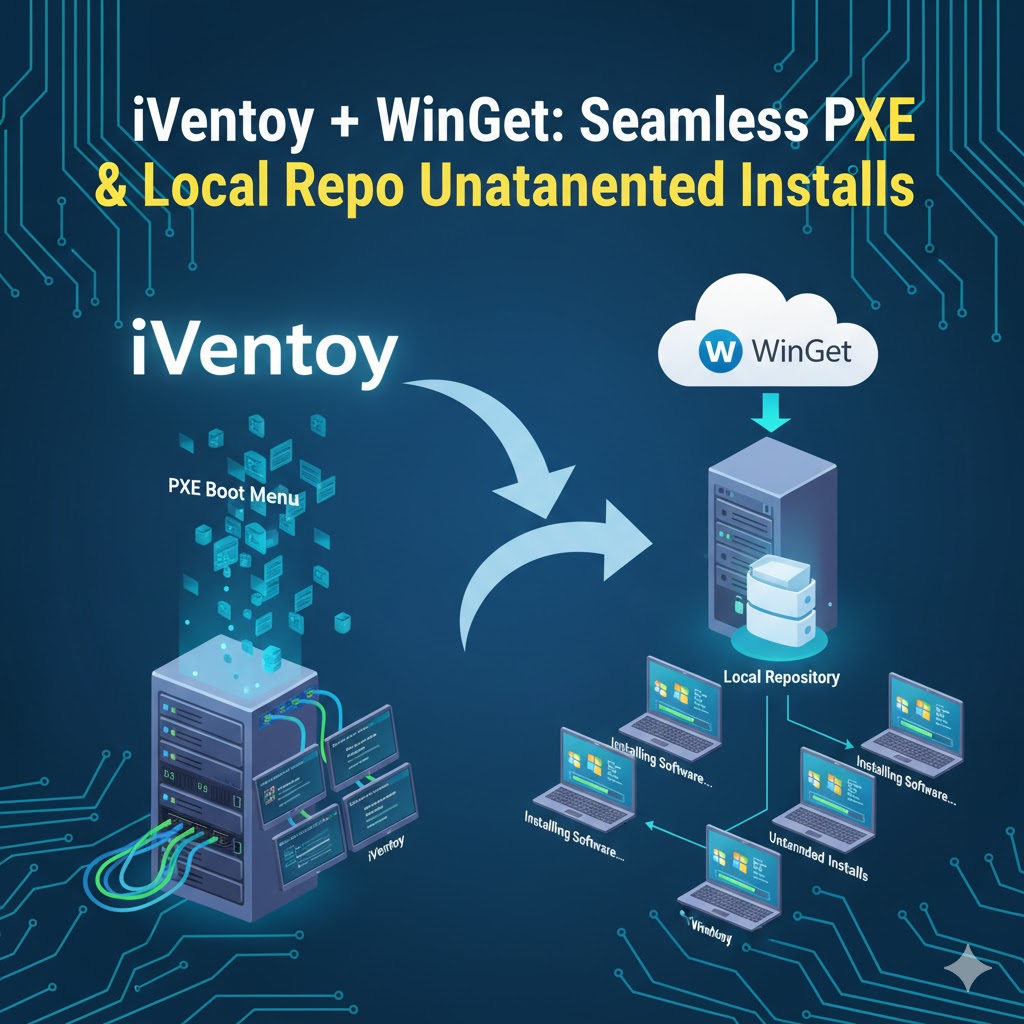
A practical guide to deploying Windows without SCCM’s cost and complexity
- Architecture Overview
- Setting Up DHCP for PXE Boot
- Installing iVentoy Server
- Managing Windows ISOs
- Creating Unattend Files
- Building a Local WinGet Cache
- Automated Software Installation
Why Choose This Solution?
If you’ve ever looked at SCCM pricing and thought “there must be a simpler way,” you’re not alone. This guide shows you how to build a professional Windows deployment system using free, open-source tools that gets you 90% of SCCM’s deployment capabilities at less than 10% of the cost. (for enterprise use)
Perfect for:
- Schools deploying computer labs
- PC repair shops needing quick, standardized installs
- Small businesses preparing devices for Autopilot
- IT departments without enterprise budgets
Architecture Overview
Here’s what we’re building:
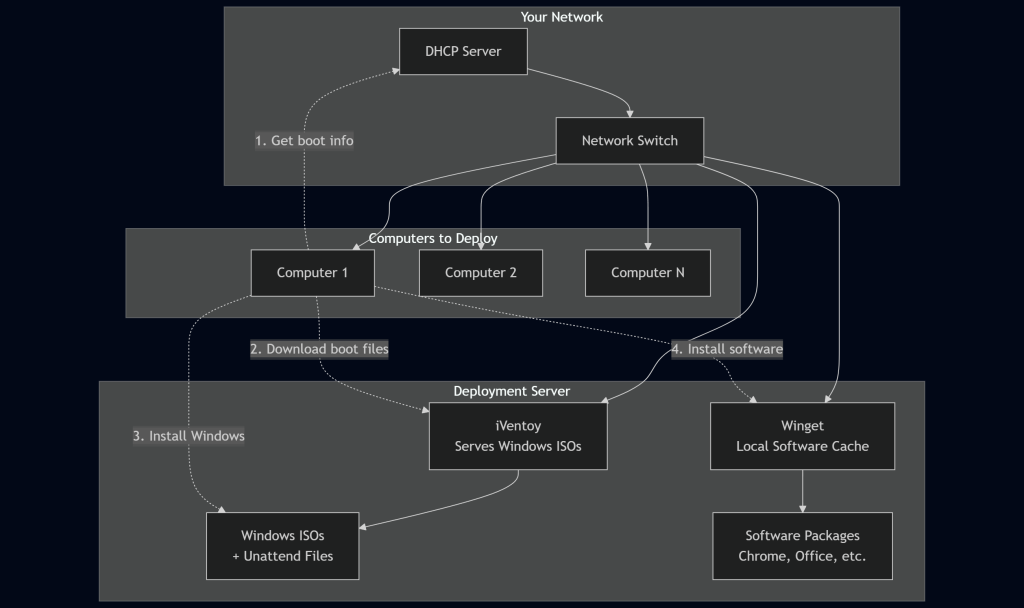
How it works:
- PC boots from network and asks DHCP “where do I boot from?”
- DHCP points to iVentoy server
- iVentoy presents a menu of Windows versions
- Windows installs automatically using your unattend.xml
- Post-installation scripts grab software from local winget cache
- Done! Fully configured PC in 20-25 minutes
Step 1: Configure DHCP for PXE Boot
Your DHCP server needs to tell computers where to find the boot server. This is done using DHCP Options 66 and 67.
If you’re using MikroTik (like I do), here are the two commands you need:
# Tell PCs where the boot server is (Option 66)
/ip dhcp-server option add code=66 name=PXE-Server value="'192.168.1.100'"

# Tell PCs what boot file to use (Option 67)
/ip dhcp-server option add code=67 name=PXE-Bootfile value="'iventoy_loader_16000_bios.efi'"

# Apply these options to your DHCP network
/ip dhcp-server network set [find address=192.168.1.0/24] dhcp-option=PXE-Server,PXE-Bootfile
Replace 192.168.1.100 with your server’s IP address!
if you are running DHCP server on Windows machine
Set-DhcpServerv4OptionValue -ScopeId 192.168.1.0 -OptionId 66 -Value "192.168.1.100"
Set-DhcpServerv4OptionValue -ScopeId 192.168.1.0 -OptionId 67 -Value "iventoy_loader_16000_bios.efi"
Step 2: Install iVentoy
iVentoy is the magic that makes this easy. Unlike traditional PXE servers that require extracting ISOs, iVentoy serves them directly.
Installation ? just visit iVentoy (https://www.iventoy.com/en/index.html) website and just grab your Windows /Linux fresh release and start.
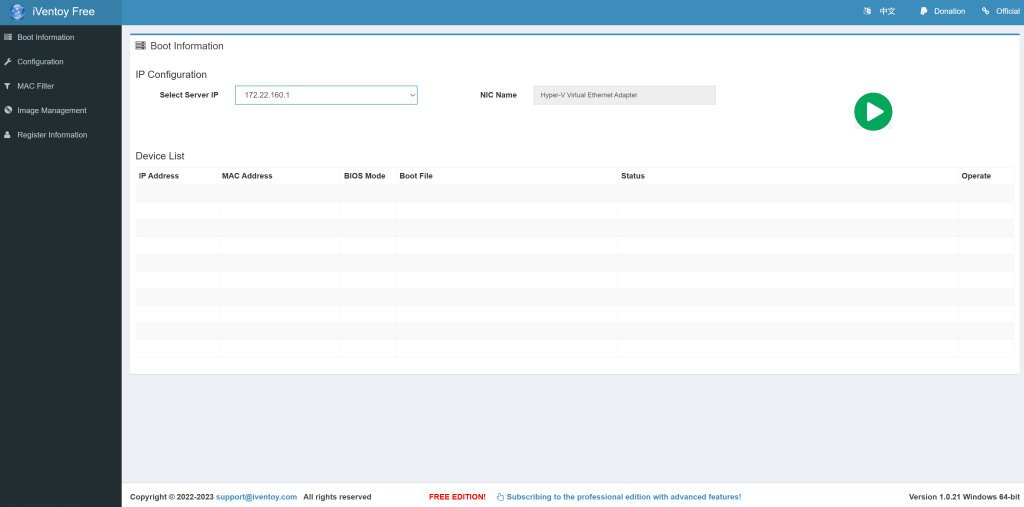
on Windows you should enable some firewall ports:
New-NetFirewallRule -DisplayName "iVentoy HTTP" -Direction Inbound -Protocol TCP -LocalPort 16000 -Action Allow

New-NetFirewallRule -DisplayName "iVentoy TFTP" -Direction Inbound -Protocol UDP -LocalPort 69 -Action Allow

New-NetFirewallRule -DisplayName "iVentoy Management" -Direction Inbound -Protocol TCP -LocalPort 26000 -Action Allow
Step 3: Manage Your Windows ISOs
How to Add ISOs? This is where iVentoy shines. Just drop your ISOs into a ‘ISO’ folder. No extraction needed!
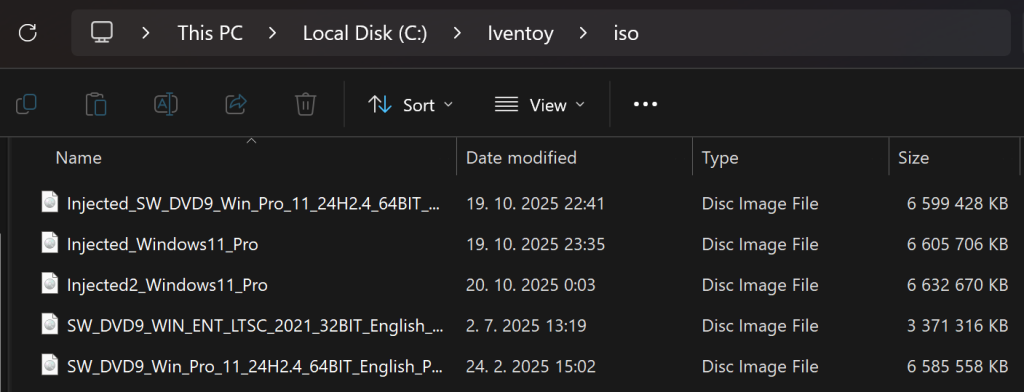
Step 4: Create & apply Unattended Installation Files
Unattend.xml files automate Windows installation. No more clicking through setup screens!
Easy Way: Use the Online Generator
I recommend using Schneegans Unattend Generator:
🔗 https://schneegans.de/windows/unattend-generator/
This tool creates unattend.xml files through a simple web interface:
- Choose your Windows version
- Set timezone and language
- Configure privacy settings (disable telemetry, Cortana, etc.)
- Create local administrator account
- Add commands to run after installation
- Download your
autounattend.xmland save it to your ” iVentoy script ” folder
Configure iVentoy to Use It
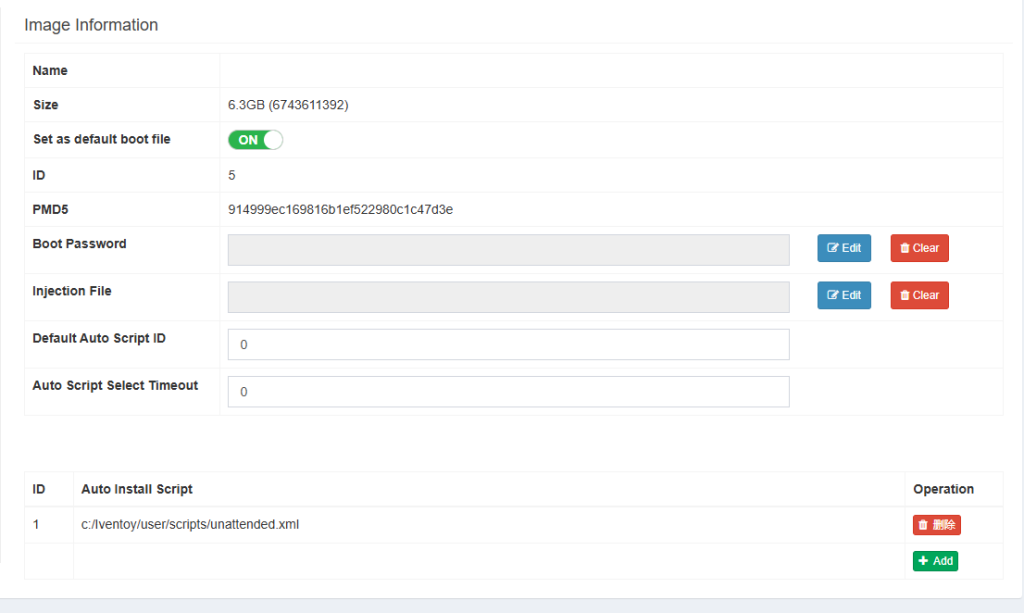
- Open iVentoy web interface:
http://your-server:26000 - Go to Image Management
- Click on Windows ISO which will be used for unattended installation
- Add Auto Install Script and give full path of your
unattended.xml(c:/Iventoy/user/scripts/unattended.xml) - Associate it with your Windows ISO
- Select as default boot file
- *optional – protect with password
Note: We’ll cover advanced unattend.xml customization (registry edits, post-installation tasks, complex configurations) in the next article!
Step 5: Set Up Local WinGet with rewinged
Rewinged (https://github.com/jantari/rewinged) is a self-hosted WinGet repository. Think of it as your own private app store that works offline.
Why Use Rewinged?
- WinGet ( Microsoft Package Manger ) is part of Windows 11 , can be easily configured with source as secure source of packages.
- 6-8x faster software installation (local network vs internet)
- Works offline – no internet needed
- Control versions – deploy exactly what you want
- Save bandwidth – download packages once, deploy many times
Install with Docker, feel free use my docker-compose.yml as a reference, using port 8443 & custom certificates in certs subfolder
services:
  rewinged:
    image: ghcr.io/jantari/rewinged:stable
    container_name: rewinged
    ports:
      - "8443:8080"
    volumes:
      - ./packages:/packages:ro
      - ./installers:/app/installers
      - ./certs:/certs:ro
    environment:
      - REWINGED_LISTEN=0.0.0.0:8080
      - REWINGED_MANIFESTPATH=/packages
      - REWINGED_AUTOINTERNALIZE=true
      - REWINGED_AUTOINTERNALIZEPATH=/app/installers
      - REWINGED_LOGLEVEL=debug
      - REWINGED_HTTPS=true
      - REWINGED_HTTPSCERTIFICATEFILE=/certs/cert.pem
      - REWINGED_HTTPSPRIVATEKEYFILE=/certs/private.key
    restart: unless-stopped
How to start?
Install Docker ( I’m using Rancher Desktop because of Docker desktop license terms of use, WSL is prerequirement ), upload certificate – or create own for Lab (Generating self-signed certificates on Windows | by Rory Braybrook | The new control plane | Medium) & start rewinged
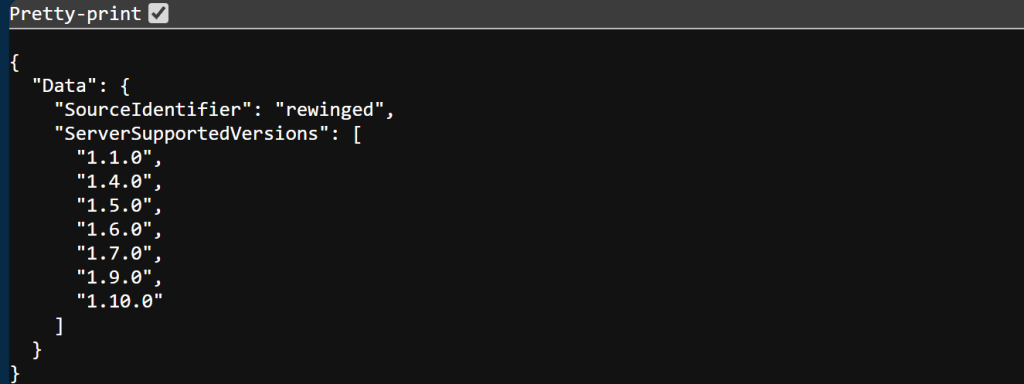
sudo docker-compose up -dAccess it at: https://localhost:8443/api/information , output should be :
Populate with some test Software
Run this PowerShell script on any Windows PC with internet from folder where this rewinged docker is started:
# Downloads manifest YAML files from the official winget repository

$OutputDir = ".\manifests"
$PackagesToDownload = @(
    "Microsoft.Edge",
    "Google.Chrome",
    "Mozilla.Firefox",
    "7zip.7zip",
    "Adobe.Acrobat.Reader.64-bit",
    "VideoLAN.VLC",
    "Notepad++.Notepad++",
    "Git.Git",
    "Microsoft.VisualStudioCode",
    "Python.Python.3.12"
)

# Create output directory
New-Item -ItemType Directory -Force -Path $OutputDir | Out-Null
foreach ($PackageId in $PackagesToDownload) {
    Write-Host "`nProcessing: $PackageId" -ForegroundColor Yellow

    # Parse PackageId to get publisher and name
    $parts = $PackageId -split '\.'
    $publisher = $parts[0]
    $name = ($parts[1..($parts.Length-1)] -join '.')

    # Get package info to find version
    $info = winget show --id $PackageId --exact 2>&1 | Out-String

    if ($info -match 'Version:\s+(.+)') {
        $version = $matches[1].Trim()
        Write-Host "  Found version: $version" -ForegroundColor Gray

        # Construct GitHub raw URL
        $manifestUrl = "https://raw.githubusercontent.com/microsoft/winget-pkgs/master/manifests/$($publisher.Substring(0,1).ToLower())/$publisher/$name/$version/"

        # Create local directory structure
        $localPath = Join-Path $OutputDir "$publisher\$name\$version"
        New-Item -ItemType Directory -Force -Path $localPath | Out-Null

        # Download manifest files (installer, locale, version)
        $manifestFiles = @(
            "$PackageId.installer.yaml",
            "$PackageId.locale.en-US.yaml",
            "$PackageId.yaml"
        )

        foreach ($file in $manifestFiles) {
            try {
                $url = $manifestUrl + $file
                $destination = Join-Path $localPath $file
                Invoke-WebRequest -Uri $url -OutFile $destination -ErrorAction Stop
                Write-Host "Downloaded: $file" -ForegroundColor Green
            }
            catch {
                Write-Host "Skipped: $file (not found or optional)" -ForegroundColor DarkGray
            }
        }
    }
    else {
        Write-Host "Could not determine version" -ForegroundColor Red
    }
}
Write-Host "Manifests downloaded to: $OutputDir" -ForegroundColor Green
Step 6: Automate Software Installation
Now let’s put it all together. This script runs after Windows installation and installs software from your local rewinged cache.
Create the Installation Script Install-Software.ps1
# save as Install-Software.ps1
# Automated software installation from local cache

$RewingedServer = "http://192.168.1.100:8443"
$LogFile = "C:\Windows\Logs\Software\WingetApps-Installation.log"

# Software to install
$Apps = @(
    @{Name="Microsoft Edge"; Id="Microsoft.Edge"},
    @{Name="Google Chrome"; Id="Google.Chrome"},
    @{Name="7-Zip"; Id="7zip.7zip"},
    @{Name="VLC Media Player"; Id="VideoLAN.VLC"}
)

# Configure WinGet to use local repository
winget source add --name "LocalWinget" --arg "$RewingedServer" --type "Microsoft.REST"

# Install each app
foreach ($App in $Apps) {
    Write-Host "Installing $($App.Name)..." -ForegroundColor Cyan

    winget install --id $App.Id --source "LocalWinget" --silent --accept-package-agreements

    if ($LASTEXITCODE -eq 0) {
        Write-Host "$($App.Name) installed" -ForegroundColor Green
    }
}
Reference It from Unattend.xml
When creating your unattend.xml, add this to the FirstLogonCommands section:
<FirstLogonCommands>
    <SynchronousCommand wcm:action="add">
        <Order>1</Order>
        <CommandLine>powershell.exe -ExecutionPolicy Bypass -File \\server\scripts\Install-Software.ps1</CommandLine>
        <Description>Install software from local repository</Description>
    </SynchronousCommand>
</FirstLogonCommands>
Have questions or want to share your deployment experience? Drop a comment below! I’d love to hear how you’re using this solution in your environment.
Found this helpful? Share it with your IT colleagues who might be looking for a cost-effective alternative to SCCM!
Leave a Reply