

After publishing my article PXE with iVentoy: Easy Alternative to SCCM for Windows Deployment I got a valuable feedback on social networks. Why use this solution if Autopilot or other tools are available?
Let me back up a bit. I’ve been working on deployment projects where building a gold image or setting up SCCM wasn’t an option. Imagine school environments with tight budgets – they need bulletproof Windows deployment that just works, costs nothing, and doesn’t require dedicated infrastructure. One project was for a technical school with more than 100 workstations that needed to be reimaged frequently. Another was for a small IT business that couldn’t justify SCCM licensing but needed consistent deployments.
The solution? PXE boot with iVentoy, vanilla Windows ISO, and a properly configured unattend.xml that does all the heavy lifting. No gold images to maintain, no SCCM infrastructure, no MDT complexity. Just network boot, automatic installation, and a fully configured machine at the end.
But here’s the thing, unattend.xml is powerful but as per my observation, poorly explained. Microsoft’s official docs are technically accurate but practically useless for real-world scenarios. After asking the same questions repeatedly, I realized I needed to write a proper explanation of what unattend.xml can actually do and how to use it in PXE deployment scenarios.
This isn’t about enterprise SCCM deployments or Intune provisioning. This is about getting Windows deployed automatically in environments where you need it cheap, reliable, and without complex infrastructure. Let’s dive into what makes unattend.xml useful.
Seven Configuration steps – Understanding Windows Setup
Windows Setup processes your unattend.xml file in distinct phases called “passes.” Think of them as checkpoints during the installation journey. Put settings in the wrong pass, and they’ll either fail silently or not execute at all.
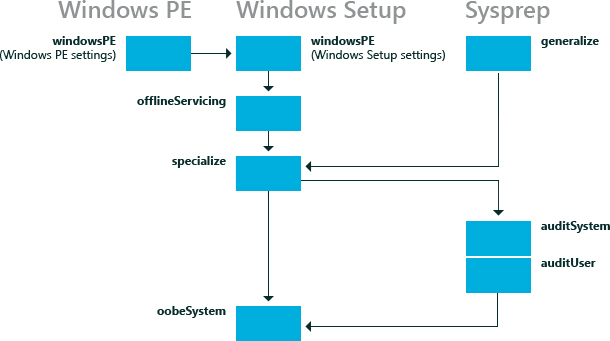
1. WindowsPE
Imagine this, you boot from USB and instead of seeing those language selection screens, Windows immediately starts doing its thing. That’s windowsPE pass in action.
This is the pre-installation environment – you know, that blue screen with the Windows logo while Setup is running. During this phase, Windows Setup is reading your InputLocale and UILanguage settings to figure out the keyboard layout and display language. At the same time, DiskConfiguration is being processed, which means Setup is partitioning and formatting your disk according to the CreatePartitions and ModifyPartitions elements you specified. The ProductKey gets validated here too, and Setup determines which Windows edition to install from the WIM file based on your ImageInstall configuration. Basically, everything that needs to happen before Windows actually copies files to the hard drive happens in this pass.
The key components we’re working with here are
Microsoft-Windows-International-Core-WinPE for language settings Microsoft-Windows-Setup for disk configuration, product key, and image selection.
2. OfflineServicing
Here’s something interesting – this pass runs after the Windows image gets applied to your disk but before the system boots for the first time.
It’s basically Windows Setup modifying the offline image that’s sitting on your hard drive. If you’re using DISM to inject drivers or install updates into a WIM file, those same operations can happen automatically during this pass through unattend.xml. You can enable or disable Windows features like .NET Framework , install language packs, or inject drivers.
The most common setting here is
Microsoft-Windows-LUA-Settings you have to enable UAC ( Windows User Account Controls, historically named Limited User Account ). Most people skip this pass in unattend.xml though and handle these tasks during image preparation instead, because it’s easier to maintain and troubleshoot.
3. Generalize
This one only runs when you execute sysprep /generalize, not during regular installations.
When you run sysprep with the generalize option, Windows removes all computer-specific information the SID gets regenerated, activation resets unless you prevent it, hardware-specific settings are cleared, and the machine prepares itself to be captured as a master image.
The main component here are:
Microsoft-Windows-Security-SPP resets licensing values that were set during system installation and image testing. It restores the computer to a clean-install licensing state.
Microsoft-Windows-PnpSysprep for controlling device driver persistence during sysprep
4. Specialize
This pass is applied on first boot after installation, before anyone logs in. You’re seeing “Getting Windows ready” or “Setting up devices” on screen, that’s specialize pass working in the background.
Windows is setting the computer name based on your ComputerName element, joining the domain if you configured UnattendedJoin, applying the TimeZone setting, configuring network settings, and finalizing regional settings. It’s called “specialize” because the generic Windows image is now becoming specialized for this specific computer.
The main component is
Microsoft-Windows-Shell-Setup for computer name, organization, and time zone, plus
Microsoft-Windows-UnattendedJoin if you’re doing automatic domain join
Microsoft-Windows-International-Core for regional settings.
If ComputerName is not specified, a random computer name is generated.
If ComputerName set to an asterisk (*) or is included but empty (“”), Windows creates a random 15-character name using up to 7 characters from FullName and Organization, then a dash, then more random characters.
Using <ComputerName>*</ComputerName> to generate a random name, then rename it properly during FirstLogonCommands with a script that implements your naming convention.
5. AuditSystem
This pass only triggers when you boot into Audit Mode – either by pressing Ctrl+Shift+F3 during OOBE or by configuring <Reseal><Mode>Audit</Mode></Reseal> in your answer file.
When in Audit Mode, the system runs as the built-in Administrator account, no user profile exists yet, and you’re free to install drivers and applications at the system level.
OEMs use this extensively for installing hardware-specific drivers and branded applications before shipping systems to customers. In enterprise environments, you might use it when building reference images that need software pre-installed before sysprep and capture.
Most enterprise deployments skip auditSystem and auditUser entirely because they handle application deployment through other means like Intune, SCCM, or Group Policy.
6. AuditUser
If you’re continuing in Audit Mode after auditSystem completes, auditUser is the next phase.
The difference is execution context, auditSystem runs in system context, auditUser runs in user profile context.
This is where user-level customizations happen: Start menu layouts, desktop shortcuts, per-user application settings, default user profile modifications. It’s all about configuring things that live in user profiles rather than system-wide settings.
7. OobeSystem
This is where the magic happens.
During OOBE (Out-of-Box Experience) with those screens like “Let’s start with region” or those Windows Wireless network connection screen, oobeSystem pass is executing. This pass configures whether users see setup screens or boot directly to desktop.
The OOBE component controls which screens get skipped – HideEULAPage, HideOnlineAccountScreens, SkipMachineOOBE all determine what the user experiences.
When FirstLogonCommands executes, you’re no longer just configuring Windows settings, you’re running arbitrary commands and scripts. This is where you rename the computer, install drivers, configure firewall rules, install applications, apply branding, and basically do everything that makes this deployment yours.
The main components are
Microsoft-Windows-Shell-Setup\OOBE for skipping setup screens
Microsoft-Windows-Shell-Setup\UserAccounts for creating local accounts
Microsoft-Windows-Shell-Setup\FirstLogonCommands for post-installation automation.
XML details:
Microsoft updated their partition layout guidance in 2023, and it’s important to follow these specs for maximum compatibility with BitLocker, Windows Recovery, and future Windows updates. When you’re deploying OS, getting the partition layout right from the start is critical – you can’t easily fix it later without wiping the machine again.
The Current Best Practice Layout
For UEFI systems (which is everything modern), you need four partitions:
<DiskConfiguration>
    <Disk wcm:action="add">
        <DiskID>0</DiskID>
        <WillWipeDisk>true</WillWipeDisk>
        <CreatePartitions>
            <!-- WinRE partition -->
            <CreatePartition wcm:action="add">
                <Order>1</Order>
                <Type>Primary</Type>
                <Size>990</Size>
            </CreatePartition>
            <!-- EFI System Partition -->
            <CreatePartition wcm:action="add">
                <Order>2</Order>
                <Type>EFI</Type>
                <Size>250</Size>
            </CreatePartition>
            <!-- MSR partition -->
            <CreatePartition wcm:action="add">
                <Order>3</Order>
                <Type>MSR</Type>
                <Size>128</Size>
            </CreatePartition>
            <!-- Windows OS partition -->
            <CreatePartition wcm:action="add">
                <Order>4</Order>
                <Type>Primary</Type>
                <Extend>true</Extend>
            </CreatePartition>
        </CreatePartitions>
        <ModifyPartitions>
            <ModifyPartition wcm:action="add">
                <Order>1</Order>
                <PartitionID>1</PartitionID>
                <Label>WINRE</Label>
                <Format>NTFS</Format>
                <TypeID>DE94BBA4-06D1-4D40-A16A-BFD50179D6AC</TypeID>
            </ModifyPartition>
            <ModifyPartition wcm:action="add">
                <Order>2</Order>
                <PartitionID>2</PartitionID>
                <Label>System</Label>
                <Format>FAT32</Format>
            </ModifyPartition>
            <ModifyPartition wcm:action="add">
                <Order>3</Order>
                <PartitionID>3</PartitionID>
            </ModifyPartition>
            <ModifyPartition wcm:action="add">
                <Order>4</Order>
                <PartitionID>4</PartitionID>
                <Label>Windows</Label>
                <Letter>C</Letter>
                <Format>NTFS</Format>
            </ModifyPartition>
        </ModifyPartitions>
    </Disk>
</DiskConfiguration>
Asking why?
WinRE > 990MB
Microsoft learned the hard way that 300MB fills up quickly with feature updates. The recovery environment needs space for temporary files during updates. I’ve seen systems with 300MB WinRE partitions fail to install feature updates because there wasn’t enough scratch space. Go with 990MB minimum
EFI > 250MB
The EFI partition stores boot loaders for Windows and potentially other operating systems. 100MB worked for single-boot systems but caused issues with dual-boot configurations or during Upgrade to Windows 11 24H2. Microsoft now recommends 200MB as the minimum for modern systems. You can use 512MB on any system that might ever dual-boot.
Older guides put WinRE at the end of the disk. Microsoft reversed this recommendation because placing WinRE first prevents it from getting in the way of OS partition expansions. You can safely extend the Windows partition without worrying about moving the recovery partition.
That GUID DE94BBA4-06D1-4D40-A16A-BFD50179D6AC marks the partition as a recovery partition.Windows hides it from File Explorer, and disk management tools handle it specially. Without this TypeID, Windows treats it as a regular data partition.
OOBE Configuration – Skip Everything
The OOBE section in oobeSystem pass controls what users see during first boot. Here’s how to skip all the annoying prompts:
<OOBE>
    <HideEULAPage>true</HideEULAPage>
    <HideOEMRegistrationScreen>true</HideOEMRegistrationScreen>
    <HideOnlineAccountScreens>true</HideOnlineAccountScreens>
    <HideWirelessSetupInOOBE>false</HideWirelessSetupInOOBE>
    <NetworkLocation>Work</NetworkLocation>
    <SkipUserOOBE>true</SkipUserOOBE>
    <SkipMachineOOBE>true</SkipMachineOOBE>
</OOBE>
Key settings explained:
HideOnlineAccountScreens– critical for domain environments. Prevents “Sign in with Microsoft” promptsHideWirelessSetupInOOBE– set to false for laptops that need WiFi configured before domain joinNetworkLocation– Work=Domain profile, Home=Private profile
Registry Tweaks for Better User Experience
These registry changes improve the out-of-box experience. Add them to FirstLogonCommands:
Show File Extensions
<SynchronousCommand wcm:action="add">
    <Order>4</Order>
    <CommandLine>reg add "HKCU\Software\Microsoft\Windows\CurrentVersion\Explorer\Advanced" /v HideFileExt /t REG_DWORD /d 0 /f</CommandLine>
</SynchronousCommand>
Show Hidden Files
<SynchronousCommand wcm:action="add">
    <Order>5</Order>
    <CommandLine>reg add "HKCU\Software\Microsoft\Windows\CurrentVersion\Explorer\Advanced" /v Hidden /t REG_DWORD /d 1 /f</CommandLine>
</SynchronousCommand>
Disable Windows 11 Widgets
<SynchronousCommand wcm:action="add">
    <Order>6</Order>
    <CommandLine>reg add "HKCU\Software\Microsoft\Windows\CurrentVersion\Explorer\Advanced" /v TaskbarDa /t REG_DWORD /d 0 /f</CommandLine>
</SynchronousCommand>
Disable Search Highlights on Taskbar
<SynchronousCommand wcm:action="add">
    <Order>7</Order>
    <CommandLine>reg add "HKCU\Software\Microsoft\Windows\CurrentVersion\Search" /v SearchboxTaskbarMode /t REG_DWORD /d 0 /f</CommandLine>
</SynchronousCommand>
Disable Consumer Features (Microsoft Store Auto-Install)
<SynchronousCommand wcm:action="add">
    <Order>10</Order>
    <CommandLine>reg add "HKLM\SOFTWARE\Policies\Microsoft\Windows\CloudContent" /v DisableWindowsConsumerFeatures /t REG_DWORD /d 1 /f</CommandLine>
</SynchronousCommand>
Getting Scripts from the Network
Instead of embedding scripts in your Windows image, pull them from the network during FirstLogonCommands. This keeps your image small and scripts easy to update. In school environments where I’ve deployed this, updating scripts on a web server is much easier than rebuilding ISO files every time something changes.
The beauty of this approach for budget deployments: you’re using a vanilla Windows ISO from Microsoft, no custom images to maintain, and all your customization happens via network-downloaded scripts. When the school changes their mandatory software list or security policies change, just update the scripts on the server. Next deployment automatically gets the new configuration.
Option 1: Custom Winget Repository
Set up a local Winget repository for your organization’s apps and scripts. This works great for school environments – you can host it on any web server (even a Raspberry Pi), and it gives you centralized control over what gets installed:
<SynchronousCommand wcm:action="add">
    <Order>15</Order>
    <CommandLine>winget source add -n rewinged-local -a https://192.168.1.100:8080/api -t "Microsoft.Rest"</CommandLine>
</SynchronousCommand>
<SynchronousCommand wcm:action="add">
    <Order>16</Order>
    <CommandLine>winget install --id Contoso.DeploymentScripts -s rewinged-local --silent</CommandLine>
</SynchronousCommand>
This installs your custom package from the internal repository. The package can contain all your deployment scripts, which then execute in the correct order.
Option 2: Direct HTTPS Download
Simple and effective for smaller environments:
<SynchronousCommand wcm:action="add">
<Order>20</Order>
<CommandLine>powershell.exe -Command "Invoke-WebRequest -Uri 'https://192.168.1.100/scripts/bootstrap.ps1' -OutFile 'C:\Temp\bootstrap.ps1'; & 'C:\Temp\bootstrap.ps1'"</CommandLine>
</SynchronousCommand>The bootstrap script then downloads and executes additional scripts. Your bootstrap.ps1 can download a manifest that lists all scripts to run, verify their integrity with hash checks, and execute them in the correct order.
Option 3: Azure Blob Storage with SAS Token
For cloud-first environments:
<SynchronousCommand wcm:action="add">
<Order>30</Order>
<CommandLine>powershell.exe -Command "$sas = '?sv=2021-06-08&ss=b&srt=sco&sp=r&se=2025-12-31&st=2025-01-01&spr=https&sig=...'; Invoke-WebRequest -Uri 'https://deploymentscripts.blob.core.windows.net/scripts/setup.ps1' + $sas -OutFile 'C:\Temp\setup.ps1'; & 'C:\Temp\setup.ps1'"</CommandLine>
</SynchronousCommand>I would recommend to generate time-limited SAS tokens and embed them in your unattend.xml. When tokens expire, generate new ones and rebuild the deployment media.
Option 4: SMB Network Share
Classic approach that still works:
<SynchronousCommand wcm:action="add">
    <Order>35</Order>
    <CommandLine>net use Z: \\fileserver\deployment$ /user:domain\svcaccount P@ssw0rd</CommandLine>
</SynchronousCommand>
<SynchronousCommand wcm:action="add">
    <Order>36</Order>
    <CommandLine>powershell.exe -File "Z:\Scripts\DeploymentMaster.ps1"</CommandLine>
</SynchronousCommand>
<SynchronousCommand wcm:action="add">
    <Order>37</Order>
    <CommandLine>net use Z: /delete</CommandLine>
</SynchronousCommand>
Never put domain admin credentials in unattend.xml. Create a dedicated service account with read-only access to the deployment share.
Putting It All Together: The FirstLogonCommands Workflow
Looking at the complete FirstLogonCommands section from my deployment, you can see how everything chains together. The first three commands are quick registry tweaks that configure Control Panel views and disable the network location wizard, these execute in seconds and set up a better user experience. Then comes the computer rename in Order 4, followed immediately by a reboot in Order 5 with a 10-second countdown. This reboot is critical because the computer name change requires it to take effect.
After the system comes back up, Order 6 installs hardware drivers using pnputil to scan and install INF files from a driver repository. Order 7 handles Windows components – things like enabling .NET Framework 3.5 (not enabled in 24H2 by default) or other optional features. Order 8 runs Windows Update to patch the system, which can take significant time but ensures the machine is secure before production use.
Orders 9 and 10 work together to validate installation of WinGet and then use it to deploy applications from either public repositories or your custom internal Winget source. Order 11 configures remote management tools like RDP, VNC or third-party remote control software.
Order 12 applies organizational branding – wallpapers, lock screens, company logos. Orders 13 through 15 handle managed applications, firewall rules, and security hardening respectively.
Order 16 enables BitLocker encryption and backs up recovery keys to your chosen location.
Finally, Order 17 runs a completion script that cleans up temporary files, logs the deployment, and optionally notifies your monitoring system that the build finished successfully.
Each script creates its own log file in C:\Windows\Logs, which makes troubleshooting straightforward.
If a deployment fails, you check the logs to see which script in the sequence had issues. The beauty of this approach is modularity – you can add, remove, or reorder scripts without touching the Windows image itself.
 <FirstLogonCommands>
                    <SynchronousCommand wcm:action="add">
                        <Description>Control Panel View</Description>
                        <Order>1</Order>
                        <CommandLine>reg add "HKEY_CURRENT_USER\Software\Microsoft\Windows\CurrentVersion\Explorer\ControlPanel" /v StartupPage /t REG_DWORD /d 1 /f</CommandLine>
                        <RequiresUserInput>true</RequiresUserInput>
                    </SynchronousCommand>
                    <SynchronousCommand wcm:action="add">
                        <Order>2</Order>
                        <Description>Control Panel Icon Size</Description>
                        <RequiresUserInput>false</RequiresUserInput>
                        <CommandLine>reg add "HKEY_CURRENT_USER\Software\Microsoft\Windows\CurrentVersion\Explorer\ControlPanel" /v AllItemsIconView /t REG_DWORD /d 1 /f</CommandLine>
                    </SynchronousCommand>
                    <SynchronousCommand wcm:action="add">
                        <Order>3</Order>
                        <Description>Control Panel Icon Size</Description>
                        <RequiresUserInput>false</RequiresUserInput>
                        <CommandLine>reg add "HKLM\SYSTEM\CurrentControlSet\Control\Network\NewNetworkWindowOff" /f</CommandLine>
                    </SynchronousCommand>
                    <SynchronousCommand wcm:action="add">
                        <Description>Rename Computer</Description>
                        <Order>4</Order>
                        <RequiresUserInput>false</RequiresUserInput>
                        <CommandLine>powershell.exe  -ExecutionPolicy Bypass "C:\Windows\Setup\Scripts\RenameComputer.ps1"</CommandLine>
                    </SynchronousCommand>
                    <SynchronousCommand wcm:action="add">
                        <Order>5</Order>
                        <Description>Reboot after rename</Description>
                        <RequiresUserInput>false</RequiresUserInput>
                        <CommandLine>cmd /c "C:\Windows\system32\shutdown.exe /r /t 10"</CommandLine>
                    </SynchronousCommand>
                    <SynchronousCommand wcm:action="add">
                        <Order>6</Order>
                        <Description>Install Drivers </Description>
                        <RequiresUserInput>false</RequiresUserInput>
                        <CommandLine>powershell.exe -ExecutionPolicy Bypass -File "c:\Windows\Setup\Scripts\InstallDriver.ps1" </CommandLine>
                    </SynchronousCommand>
                    <SynchronousCommand wcm:action="add">
                        <Description>Install Components</Description>
                        <Order>7</Order>
                        <RequiresUserInput>false</RequiresUserInput>
                        <CommandLine>powershell.exe -ExecutionPolicy Bypass -File "c:\Windows\Setup\Scripts\InstallComponents.ps1" </CommandLine>
                    </SynchronousCommand>
                    <SynchronousCommand wcm:action="add">
\                        <Description>Run Windows Update</Description>
                        <Order>8</Order>
                        <RequiresUserInput>false</RequiresUserInput>
                        <CommandLine>powershell.exe -ExecutionPolicy Bypass -File "c:\Windows\Setup\Scripts\WindowsUpdate.ps1" </CommandLine>
                    </SynchronousCommand>
                    <SynchronousCommand wcm:action="add">
                        <Description>Run Apps Installation user</Description>
                        <Order>9</Order>
                        <RequiresUserInput>false</RequiresUserInput>
                        <CommandLine>powershell.exe -ExecutionPolicy Unrestricted "C:\Windows\Setup\Scripts\InstallWinget.ps1"</CommandLine>
                    </SynchronousCommand>
                    <SynchronousCommand wcm:action="add">
                        <Description>Install WingetApps</Description>
                        <Order>10</Order>
                        <RequiresUserInput>false</RequiresUserInput>
                        <CommandLine>powershell.exe -ExecutionPolicy Bypass -File "C:\Windows\Setup\Scripts\Winget_Applications.ps1" </CommandLine>
                    </SynchronousCommand>
                    <SynchronousCommand wcm:action="add">
                        <Description>Install Remote Control</Description>
                        <Order>11</Order>
                        <RequiresUserInput>false</RequiresUserInput>
                        <CommandLine>powershell.exe -ExecutionPolicy Bypass -File "C:\Windows\Setup\Scripts\RemoteControl.ps1" </CommandLine>
                    </SynchronousCommand>
                    <SynchronousCommand wcm:action="add">
                        <Order>12</Order>
                        <Description>Brandidng script</Description>
                        <CommandLine>powershell.exe -ExecutionPolicy Bypass "C:\Windows\Setup\Scripts\Branding.ps1"</CommandLine>
                    </SynchronousCommand>
                    <SynchronousCommand wcm:action="add">
                        <Order>13</Order>
                        <Description></Description>
                        <CommandLine>powershell.exe -ExecutionPolicy Bypass -File "C":\Windows\Setup\Scripts\Managed_Applications.ps1" </CommandLine>
                    </SynchronousCommand>
                    <SynchronousCommand wcm:action="add">
                        <Order>14</Order>
                        <Description></Description>
                        <CommandLine>powershell.exe -ExecutionPolicy Bypass -File "C:\Windows\Setup\Scripts\Firewall_Settings.ps1" </CommandLine>
                    </SynchronousCommand>
                    <SynchronousCommand wcm:action="add">
                        <Order>15</Order>
                        <Description></Description>
                        <CommandLine>powershell.exe -ExecutionPolicy Bypass -File "C:\Windows\Setup\Scripts\Hardening_Settings.ps1" </CommandLine>
                    </SynchronousCommand>
                    <SynchronousCommand wcm:action="add">
                        <Order>16</Order>
                        <Description></Description>
                        <CommandLine>powershell.exe -ExecutionPolicy Bypass -File "C:\Windows\Setup\Scripts\EnableBitlocker.ps1" </CommandLine>
                    </SynchronousCommand>
                    <SynchronousCommand wcm:action="add">
                        <Order>17</Order>
                        <Description></Description>
                        <CommandLine>powershell.exe -ExecutionPolicy Bypass -File "C:\Windows\Setup\Scripts\CompleteSetup.ps1" </CommandLine>
                    </SynchronousCommand>
                </FirstLogonCommands>
Understanding unattend.xml transforms Windows deployment from a manual, repetitive process into a fully automated workflow.
The seven configuration passes provide precise control over when and how settings apply during installation.
For environments deploying Windows via PXE without SCCM infrastructure, this approach delivers professional results at zero licensing cost. You’re booting from a vanilla Microsoft ISO, partitioning disks automatically, installing Windows unattended, and executing sophisticated post-deployment automation – all orchestrated through a single XML file and network-hosted scripts. When deployment requirements change, you update scripts on the server rather than rebuilding images.
The combination of iVentoy for PXE boot, unattend.xml for installation automation, and network-sourced scripts for post-deployment configuration creates a complete deployment solution that’s bulletproof, maintainable, and cost-effective. It works equally well whether you’re deploying 5 machines or 500, and it scales to handle diverse hardware without the complexity of maintaining multiple gold images.
See you later.
Leave a Reply